 ESP32
ESP32 ESP32 Temperature & Humidity Monitoring System: DHT22 + MQTT + Node-RED Dashboard Complete Project Tutorial
Project Overview
Temperature and humidity monitoring is one of the most classic and fundamental projects in the IoT field. Whether it’s smart homes, agricultural greenhouses, warehouse management, or laboratory environment monitoring, temperature and humidity data are the most basic monitoring indicators.
This tutorial will take you through building a complete ESP32 temperature and humidity monitoring system from scratch, covering:
- Hardware Layer: ESP32 development board + DHT22 temperature and humidity sensor
- Communication Layer: MQTT protocol data reporting
- Service Layer: Mosquitto MQTT Broker
- Visualization Layer: Node-RED dashboard
You can also replace the MQTT Broker with any public MQTT cloud platform (such as Alibaba Cloud IoT, Huawei Cloud IoT, EMQX Cloud) - the code only needs the Broker address modified.
Hardware List
| Component | Model | Quantity | Estimated Price |
|---|---|---|---|
| Development Board | ESP32-DevKitC or NodeMCU-32S | 1 | ¥25-40 |
| Temperature/Humidity Sensor | DHT22 (AM2302) | 1 | ¥15-25 |
| Breadboard | 830 holes | 1 | ¥8-12 |
| Jumper Wires | Male-to-female/Male-to-male | 10 pieces | ¥3-5 |
| Resistor | 4.7kΩ pull-up resistor | 1 | ¥0.1 |
| MicroUSB Cable | Data cable | 1 | ¥5-10 |
Total approximately ¥60-90, you probably already have most components on hand.
Hardware Wiring
DHT22 Pin Definition
DHT22 has 4 pins (from left to right, facing the sensor front):
| Pin | Name | Description |
|---|---|---|
| 1 | VDD | Power positive 3.3V-5V |
| 2 | DATA | Data pin |
| 3 | NC | No connection |
| 4 | GND | Power negative/Ground |
Wiring Diagram
ESP32                DHT22
------               -----
3.3V  ────────────── VDD  (Pin 1)
GPIO4 ────────────── DATA (Pin 2)
                       NC  (Pin 3) — Not connected
GND   ────────────── GND  (Pin 4)
Key Notes:
- A 4.7kΩ pull-up resistor is needed between DATA pin and 3.3V (DHT22 uses one-wire protocol, pull-up resistor ensures signal stability)
- If using DHT22 module version (with PCB), pull-up resistor is usually already integrated, can wire directly
- Keep distance between wires to avoid signal crosstalk
Environment Configuration
1. Install ESP32 Development Environment
This tutorial uses Arduino IDE, which is the fastest way to get started.
Steps:
- Download and install Arduino IDE (recommend 2.x version)
- Open Arduino IDE → File → Preferences → Additional Board Manager URLs, add:
https://raw.githubusercontent.com/espressif/arduino-esp32/gh-pages/package_esp32_index.json - Tools → Board → Boards Manager → Search “ESP32” → Install
- After installation, select ESP32 Dev Module in “Tools → Board”
2. Install Required Libraries
In Arduino IDE: Tools → Manage Libraries → Search and install the following libraries:
- DHT sensor library by Adafruit (v1.4.4+)
- Adafruit Unified Sensor by Adafruit (v1.1.9+)
- PubSubClient by Nick O’Leary (v2.8+)
- ArduinoJson by Benoit Blanchon (v6.21+)
Complete Code
#include <WiFi.h>
#include <PubSubClient.h>
#include <DHT.h>
#include <ArduinoJson.h>

// ===== WiFi Configuration =====
const char* ssid = "YourWiFiName";
const char* password = "YourWiFiPassword";

// ===== MQTT Configuration =====
const char* mqtt_server = "YourMQTTServerIP";
const int mqtt_port = 1883;
const char* mqtt_topic = "sensor/temperature-humidity";

// ===== DHT22 Configuration =====
#define DHTPIN 4          // GPIO4 connected to DHT22 DATA
#define DHTTYPE DHT22     // DHT22 sensor (AM2302)
DHT dht(DHTPIN, DHTTYPE);

// ===== Global Objects =====
WiFiClient espClient;
PubSubClient client(espClient);

// ===== Reporting Interval =====
unsigned long lastMsg = 0;
const long interval = 30000;  // Report every 30 seconds

// ===== WiFi Connection =====
void setup_wifi() {
  delay(10);
  Serial.println();
  Serial.print("Connecting to WiFi: ");
  Serial.println(ssid);

  WiFi.mode(WIFI_STA);
  WiFi.begin(ssid, password);

  while (WiFi.status() != WL_CONNECTED) {
    delay(500);
    Serial.print(".");
  }

  Serial.println();
  Serial.println("WiFi connected successfully");
  Serial.print("IP address: ");
  Serial.println(WiFi.localIP());
}

// ===== MQTT Reconnection =====
void reconnect() {
  while (!client.connected()) {
    Serial.print("Connecting to MQTT...");
    String clientId = "ESP32Client-";
    clientId += String(random(0xffff), HEX);

    if (client.connect(clientId.c_str())) {
      Serial.println("Connected");
    } else {
      Serial.print("Failed rc=");
      Serial.print(client.state());
      Serial.println(" retry in 5 seconds");
      delay(5000);
    }
  }
}

// ===== Initialization =====
void setup() {
  Serial.begin(115200);
  Serial.println("ESP32 Temperature & Humidity Monitoring System Starting");

  dht.begin();
  setup_wifi();
  client.setServer(mqtt_server, mqtt_port);
}

// ===== Main Loop =====
void loop() {
  if (!client.connected()) {
    reconnect();
  }
  client.loop();

  unsigned long now = millis();
  if (now - lastMsg > interval) {
    lastMsg = now;

    // Read temperature and humidity
    float humidity = dht.readHumidity();
    float temperature = dht.readTemperature();

    // Check if reading was successful
    if (isnan(humidity) || isnan(temperature)) {
      Serial.println("DHT22 read failed!");
      return;
    }

    // Build JSON data packet
    StaticJsonDocument<200> doc;
    doc["temperature"] = temperature;
    doc["humidity"] = humidity;
    doc["device"] = "esp32-001";

    char buffer[256];
    size_t n = serializeJson(doc, buffer);

    // Publish to MQTT
    if (client.publish(mqtt_topic, buffer, n)) {
      Serial.print("Data sent: ");
      Serial.print("Temperature: ");
      Serial.print(temperature);
      Serial.print("°C, Humidity: ");
      Serial.print(humidity);
      Serial.println("%");
    } else {
      Serial.println("MQTT publish failed");
    }
  }
}
Code Explanation
Key Function Analysis:
setup_wifi(): Connects to WiFi, displays IP address for debuggingreconnect(): MQTT auto-reconnection on disconnect (with random Client ID to avoid conflicts)dht.readTemperature()/dht.readHumidity(): Read DHT22 dataclient.publish(): Publish data to MQTT Topic in JSON format- Reports every 30 seconds to prevent data being too frequent
Why use JSON format?
- Clear structure, extensible (can add more sensor fields later)
- Node-RED and cloud platforms natively support JSON parsing
- More suitable for multi-field data than plain text format
Setting Up MQTT Broker
Option 1: Local Mosquitto (Recommended)
One-click deployment using Docker:
docker run -d \
  --name mosquitto \
  -p 1883:1883 \
  -p 9001:9001 \
  -v mosquitto_data:/mosquitto/data \
  -v mosquitto_log:/mosquitto/log \
  eclipse-mosquitto:2
Option 2: Public Cloud Platforms
| Platform | Free Quota | Features |
|---|---|---|
| EMQX Cloud | 100 connections | Global nodes, low latency |
| Alibaba Cloud IoT | 50 devices | Fast speed in China |
| HiveMQ Cloud | 10 connections | No registration needed, ready to use |
| Tencent Cloud IoT | 100 devices | Good integration with WeChat ecosystem |
Verify MQTT Service
Install MQTT client tools:
# Install mosquitto clients (macOS)
brew install mosquitto

# Subscribe to data (run in another terminal window)
mosquitto_sub -h YourMQTTServerIP -t "sensor/temperature-humidity"

# If you see output similar to below, the system is working
{"temperature": 26.3, "humidity": 58.2, "device": "esp32-001"}
Node-RED Dashboard
1. Install Node-RED
# One-click deployment using Docker
docker run -d \
  --name nodered \
  -p 1880:1880 \
  -v nodered_data:/data \
  nodered/node-red:latest
2. Install Dashboard Plugin
Access http://YourServerIP:1880 in browser, click top-right menu → Manage Palette → Install:
node-red-dashboard3. Create Data Flow
Import the following JSON flow into Node-RED:
- Copy the JSON code below
- In Node-RED: Menu → Import → Clipboard
- Paste and click deploy
[
  {
    "id": "mqtt-in",
    "type": "mqtt in",
    "topic": "sensor/temperature-humidity",
    "broker": "localhost",
    "port": "1883",
    "name": "Receive sensor data",
    "datatype": "json"
  },
  {
    "id": "function-parse",
    "type": "function",
    "func": "msg.payload = JSON.parse(msg.payload);\nmsg.temperature = msg.payload.temperature;\nmsg.humidity = msg.payload.humidity;\nreturn msg;",
    "name": "Parse JSON"
  },
  {
    "id": "ui-temp",
    "type": "ui_gauge",
    "group": "sensor-group",
    "label": "Temperature",
    "format": "{{value}} °C",
    "min": 0,
    "max": 50,
    "colors": ["#00b500","#e6e600","#ca3838"]
  },
  {
    "id": "ui-humid",
    "type": "ui_gauge",
    "group": "sensor-group",
    "label": "Humidity",
    "format": "{{value}} %",
    "min": 0,
    "max": 100,
    "colors": ["#00b500","#e6e600","#ca3838"]
  },
  {
    "id": "ui-chart",
    "type": "ui_chart",
    "group": "sensor-group",
    "label": "Temperature & Humidity Trend",
    "chartType": "line",
    "x": 10,
    "y": 10,
    "w": 20,
    "h": 10
  }
]
4. Access Dashboard
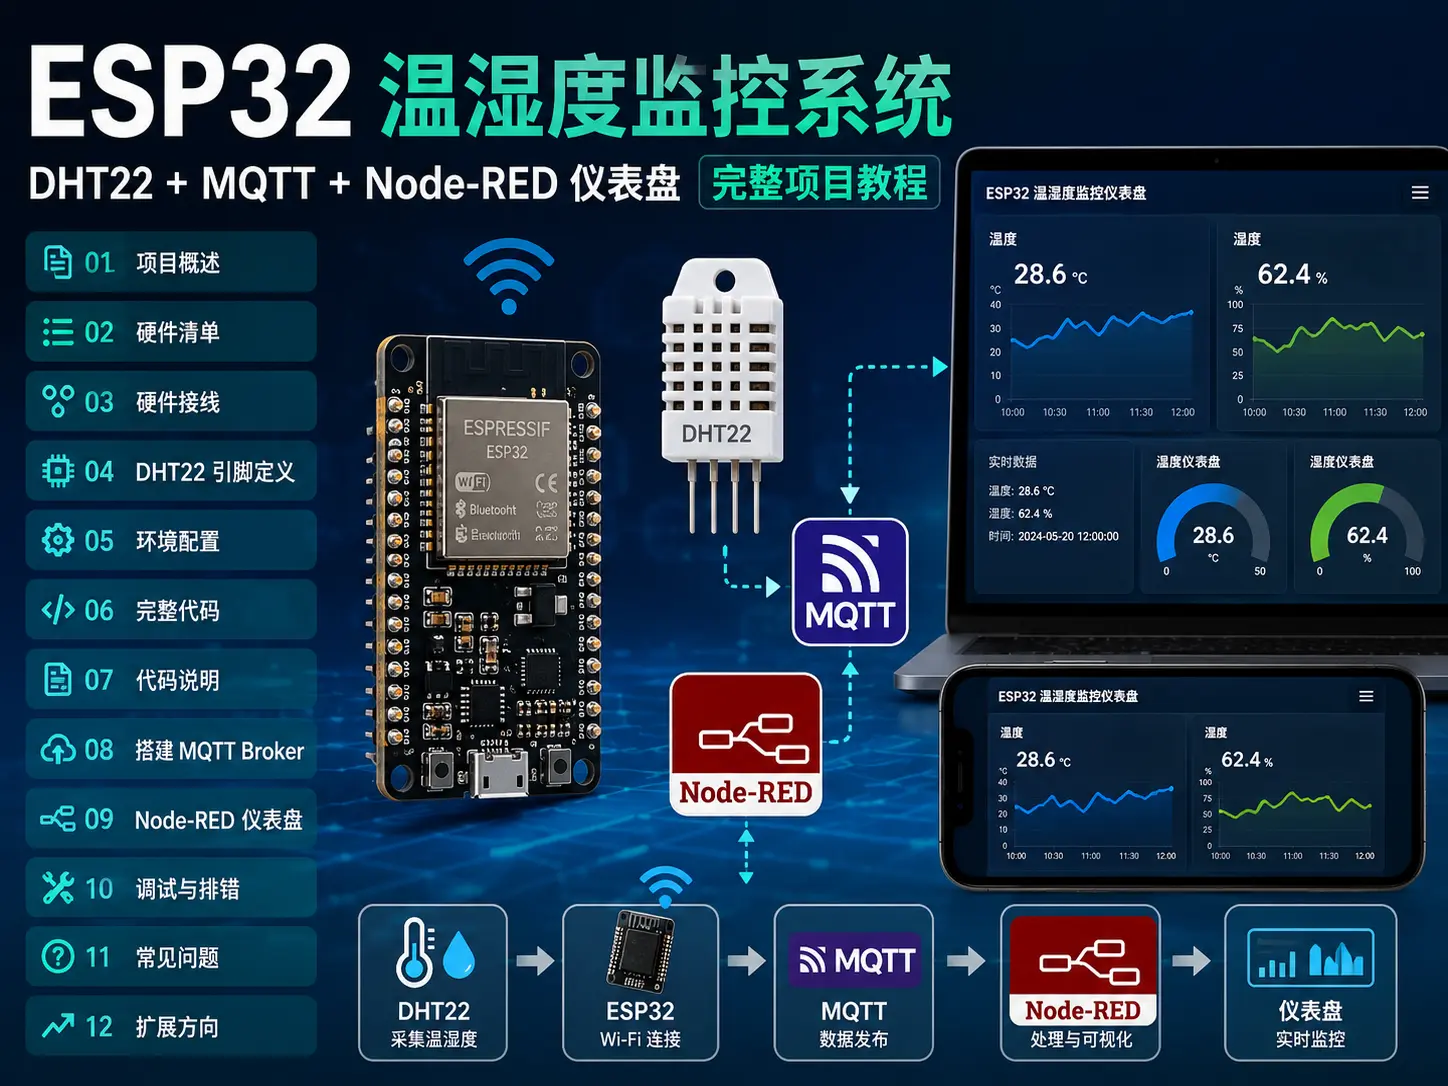
Open http://YourServerIP:1880/ui in browser to see the real-time temperature and humidity dashboard:
- Temperature gauge (0-50°C, green-yellow-red three colors)
- Humidity gauge (0-100%)
- Temperature and humidity trend line chart
Debugging and Troubleshooting
Common Issues
1. DHT22 read failure (NaN)
- Check if 4.7kΩ pull-up resistor is connected properly
- Confirm DATA pin is connected to GPIO4 (DHTPIN defined in code)
- Try switching DHT22 to DHT11 (change
#define DHTTYPE DHT22toDHT11in code)
2. WiFi connection failed
- Check if SSID and password are correct
- ESP32 only supports 2.4GHz WiFi, does not support 5GHz
- Confirm router DHCP function is working properly
3. MQTT connection failed
- Check if firewall has port 1883 open
- Confirm MQTT Broker is running:
docker ps | grep mosquitto - Check MQTT Broker logs:
docker logs mosquitto
4. Data garbled or incomplete
- Confirm JSON format is correct, can use online JSON validation tool to check
- Increase PubSubClient buffer: add
#define MQTT_MAX_PACKET_SIZE 512at the beginning of code
Extension Directions
After getting the basic project running, you can easily extend:
Multi-sensor integration:
- Add light sensor (BH1750) → Illuminance data
- Add soil moisture sensor → Plant watering monitoring
- Add air pressure sensor (BMP280) → Weather forecast
Data persistence:
- Store MQTT data in InfluxDB time-series database
- Use Grafana to create more professional dashboards
Remote access:
- Use FRP or Ngrok to expose MQTT Broker to public network
- Or directly use cloud platform MQTT services (Alibaba Cloud/Huawei Cloud/EMQX Cloud)
Low-power modification:
- Enable ESP32 deep sleep mode, battery powered
- Only wake up when data collection is needed, greatly extending battery life
Summary
This tutorial built a complete ESP32 temperature and humidity monitoring system from scratch, covering:
- Hardware selection and wiring
- Arduino IDE development environment configuration
- DHT22 data reading and MQTT reporting
- Mosquitto Broker deployment
- Node-RED dashboard visualization
This project is the best practice for IoT beginners - it contains the complete chain of an IoT system: perception layer → network layer → platform layer → application layer. After completing this project, you have mastered the core skills of IoT development and can easily extend to other sensors and application scenarios.
Next step recommendation: Try switching ESP32 to deep sleep mode, power with two AA batteries, make a wireless temperature and humidity monitoring node that can run for months.