 Jetson Nano
 Jetson Nano - Face Recognition Door Camera (face_recognition)
Learn how to build a face recognition monitoring system for your doorstep with a 1000 yuan budget: All you need is a Jetson Nano with a simple camera to identify and record visitors to your door.
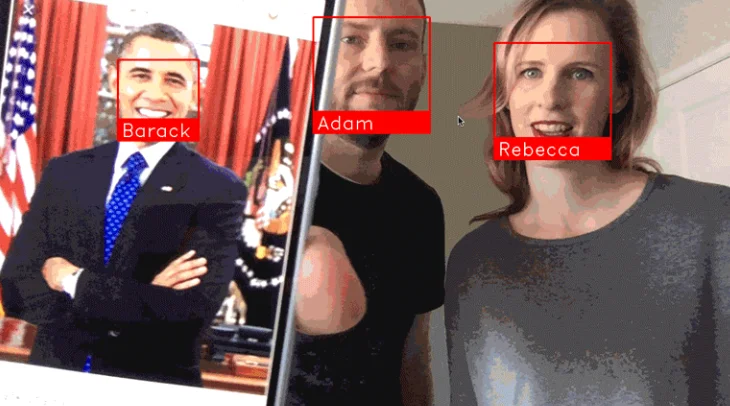
Through the face_recognition module, you can monitor in real-time whether visitors have been there before, and record exactly when and how many times they visited. Even if they wear different clothes each time, the system can still recognize them.
NVIDIA’s Jetson Nano board is incredibly powerful, allowing you to implement GPU-accelerated deep learning models on a very small budget. Jetson Nano is similar to Raspberry Pi, but the former is much faster in computation.
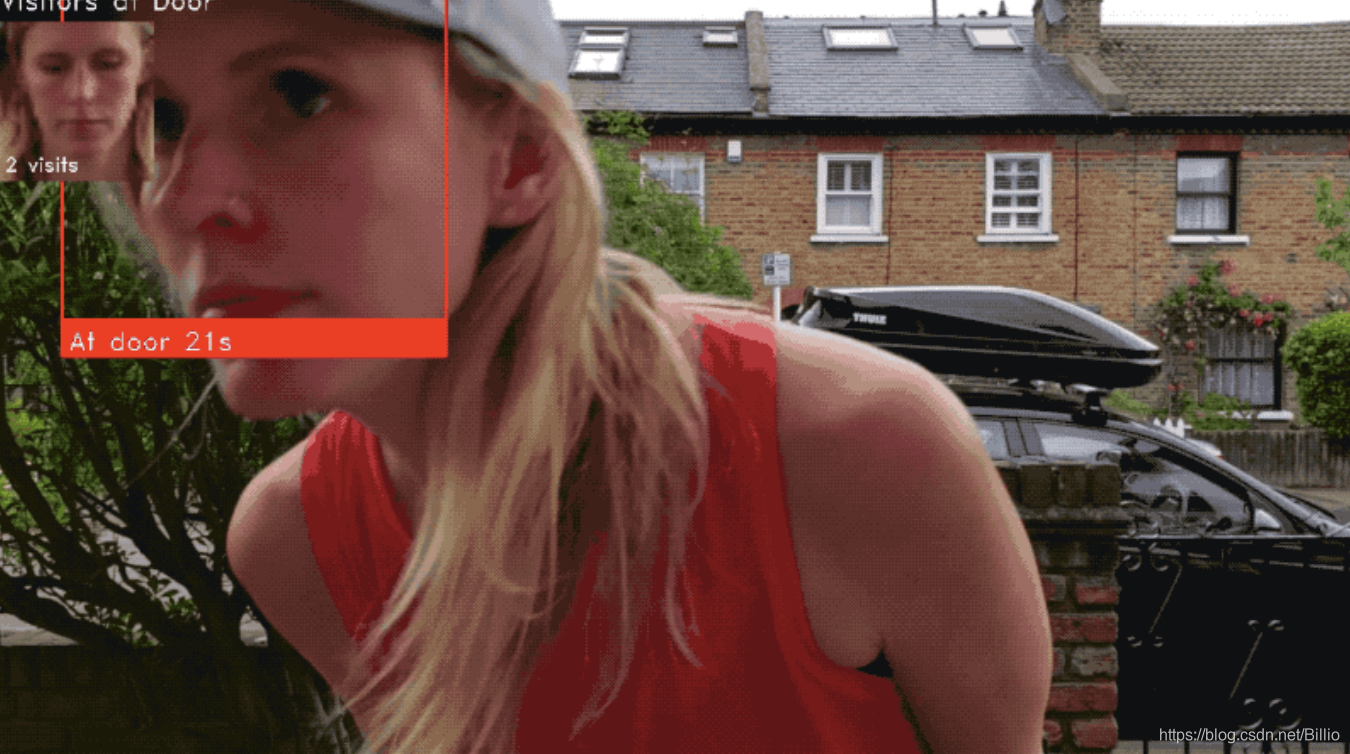 (Through the face_recognition module and Python, you can easily build your own door monitoring system to identify and record visitors)
What Do You Need?
-
One Jetson Nano development board
-
A compatible camera module (such as Raspberry Pi Camera Module V2)
-
At least a 32GB MicroSD (TF) card for flashing the system image
-
A 5V/4A MicroUSB power adapter to ensure stable power supply
-
Keyboard, mouse, and monitor (for initial system setup)
Install Jetson Nano Image
I won’t repeat how to flash the Jetson Nano system image here. If you just got it, search for other tutorials.
Connect the Camera Correctly
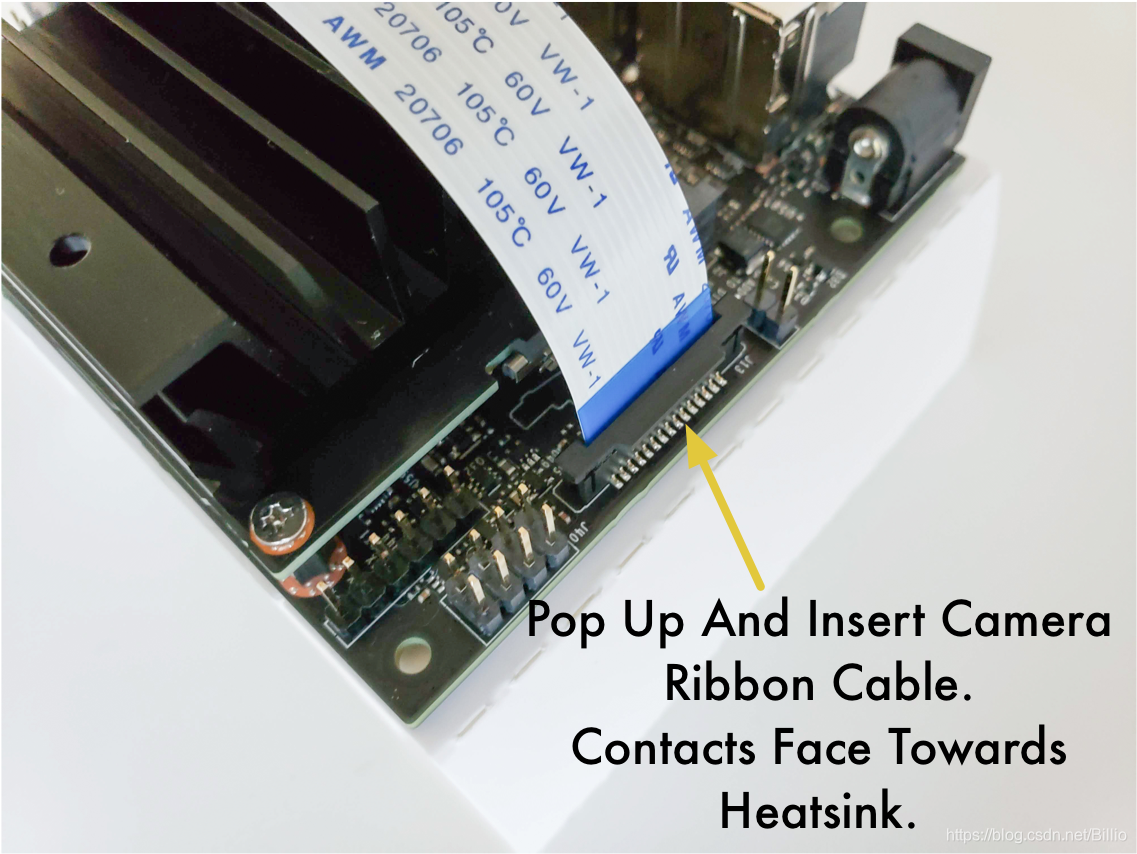 Make sure the camera is correctly connected to the Jetson Nano board!
Some people easily insert it backwards or get the lens position wrong.
Make sure the camera is correctly connected to the Jetson Nano board!
Some people easily insert it backwards or get the lens position wrong.
First Account Login Setup
When logging into the Jetson Nano system for the first time, you need to go through the standard Ubuntu Linux initial user setup, setting up your account and password (which we’ll need later in the command line).
At this initial step, Python 3.6 and OpenCV are already pre-installed, and you can immediately run Python programs through the terminal. But to run the door monitoring module properly, we still need to install some libraries for the system.
Install Required Python Libraries
To make the face recognition module run, we need to install some Python libraries first. Although Jetson Nano itself comes with many useful libraries pre-installed, you may still encounter some strange omissions. For example, OpenCV is already installed, but you need to install pip and numpy libraries before using it properly. Let’s solve this problem first.
First, open the terminal on Jetson Nano desktop using the shortcut: Ctrl + Alt + T Enter the following command in the terminal window: (if you need to enter a password, it’s the user password from the initial account creation)
sudo apt-get update
sudo apt-get install python3-pip cmake libopenblas-dev liblapack-dev libjpeg-dev
First, we update apt, which is Linux’s installation tool. Then, install some basic libraries through apt, all to support numpy and dlib operation later.
Before we proceed, we need to create a swapfile. The Jetson Nano development board only has 4GB RAM, which is not enough when running dlib, so we need to use swapfile to let the TF card space become more RAM to assist operation. Fortunately, we only need two lines of code to achieve this!
git clone https://github.com/JetsonHacksNano/installSwapfile
./installSwapfile/installSwapfile.sh
Note: This efficient method is thanks to the senior JetsonHacks, it’s really useful!
At this point, we need to restart the system to ensure the swapfile works properly. If you skip this step, you’ll likely encounter errors in the next step. You can restart from the desktop main menu, or enter the command
sudo rebootAfter rebooting and logging in, continue with the next step in the terminal window: install numpy, which is a Python library for matrix calculations
pip3 install numpyThis installation will take about 15 minutes. If the installation process seems stuck, don’t worry, just be patient.
Okay, now we’re ready to install dlib, the deep learning library created by master Davis King, which greatly improves the efficiency of the face_recognition library.
But… Jetson Nano currently has a small bug that prevents dlib from running properly. NVIDIA community experts have confirmed that this bug only requires editing one line of code to fix, so don’t worry, it’s not a big problem.
In the terminal, we first download dlib, then extract the code.
wget http://dlib.net/files/dlib-19.17.tar.bz2
tar jxvf dlib-19.17.tar.bz2
cd dlib-19.17
Before we run it, we first edit and modify one line of code:
gedit dlib/cuda/cudnn_dlibapi.cppThis will open a text editor to modify the program. The gedit above can also be changed to vi, vim, or nano commands. If you’re not familiar with these three text editing commands, search and learn on your own.
Search for line 854 of the program text:
forward_algo = forward_best_algo;Add // in front of it to comment out this code (ignore execution):
//forward_algo = forward_best_algo;Then save this text, return to the terminal command line, and install dlib:
sudo python3 setup.py installThis process takes about 30-60 minutes. The Jetson Nano may get hot during this process, but it’s okay, let it get hot, just don’t let it glow, haha.
After completing the above, we start installing the face recognition Python library face_recognition:
sudo pip3 install face_recognitionNow your Jetson Nano is ready to execute face recognition through Cuda’s GPU accelerator. The next step is to create the door monitoring (Doorcam) Python code.
Create Door Monitoring Code DoorCam
First, let’s create a dedicated program folder, then create a Python program through vi (or gedit, vim, nano commands):
cd
mkdir doorcam
vi doorcam.py
At this point, we’ll enter the vi text interface. Open this link DoorCam By ageitgey or go to the code section at the end of this article, copy all the Python code and paste it into the vi interface, and save it. (Tip for those unfamiliar with vi operations: after copying and pasting the code, press esc, type :wq! and press enter)
Now we’re fully ready to run the door monitoring!
Aren’t you excited?!?!😊
Come on, let’s start running the Python magic:
python3 doorcam.pyAt this point, you’ll see a new window pop up on the desktop. If all goes well, the video starts and you’ll be on camera!
Just like the effect with the beautiful sister below
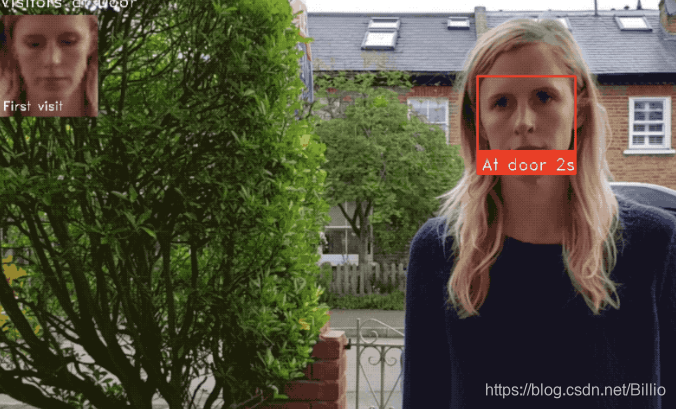 Whenever a new face appears in front of the camera, the program registers that face, displays “First Visit” in the upper right corner and tracks how long the person stays in front of the camera. It can also record how many times the person has appeared in front of the camera. If a person leaves for more than 5 minutes and appears again, it’s defined as a new visit.
You can press Q to exit at any time.
The program automatically saves every person who appears in front of the camera, with data saved in a file named known_faces.dat. Each time you restart the program, it references this data to identify whether it’s an existing visitor. If you want to clear the recorded faces, just delete this file.
Understanding the Program
Want to understand how this code works? (To be completed) The editor will find time to improve it later… If you can’t wait, search for master Adam Geitgey’s GitHub to read the English explanation.
Notes
The above tutorial content is originally from master Adam Geitgey, translated and edited based on his blog tutorial. You can go to his GitHub for further learning!
DoorCam Code
import face_recognition
import cv2
from datetime import datetime, timedelta
import numpy as np
import platform
import pickle

# Our list of known face encodings and a matching list of metadata about each face.
known_face_encodings = []
known_face_metadata = []

def save_known_faces():
    with open("known_faces.dat", "wb") as face_data_file:
        face_data =
        pickle.dump(face_data, face_data_file)
        print("Known faces backed up to disk.")

def load_known_faces():
    global known_face_encodings, known_face_metadata

    try:
        with open("known_faces.dat", "rb") as face_data_file:
            known_face_encodings, known_face_metadata = pickle.load(face_data_file)
            print("Known faces loaded from disk.")
    except FileNotFoundError as e:
        print("No previous face data found - starting with a blank known face list.")
        pass

def running_on_jetson_nano():
    # To make the same code work on a laptop or on a Jetson Nano, we'll detect when we are running on the Nano
    # so that we can access the camera correctly in that case.
    # On a normal Intel laptop, platform.machine() will be "x86_64" instead of "aarch64"
    return platform.machine() == "aarch64"

def get_jetson_gstreamer_source(capture_width=1280, capture_height=720, display_width=1280, display_height=720, framerate=60, flip_method=0):
    """
    Return an OpenCV-compatible video source description that uses gstreamer to capture video from the camera on a Jetson Nano
    """
    return (
            f'nvarguscamerasrc ! video/x-raw(memory:NVMM), ' +
            f'width=(int){capture_width}, height=(int){capture_height}, ' +
            f'format=(string)NV12, framerate=(fraction){framerate}/1 ! ' +
            f'nvvidconv flip-method={flip_method} ! ' +
            f'video/x-raw, width=(int){display_width}, height=(int){display_height}, format=(string)BGRx ! ' +
            'videoconvert ! video/x-raw, format=(string)BGR ! appsink'
            )

def register_new_face(face_encoding, face_image):
    """
    Add a new person to our list of known faces
    """
    # Add the face encoding to the list of known faces
    known_face_encodings.append(face_encoding)
    # Add a matching dictionary entry to our metadata list.
    # We can use this to keep track of how many times a person has visited, when we last saw them, etc.
    known_face_metadata.append({
        "first_seen": datetime.now(),
        "first_seen_this_interaction": datetime.now(),
        "last_seen": datetime.now(),
        "seen_count": 1,
        "seen_frames": 1,
        "face_image": face_image,
    })

def lookup_known_face(face_encoding):
    """
    See if this is a face we already have in our face list
    """
    metadata = None

    # If our known face list is empty, just return nothing since we can't possibly have seen this face.
    if len(known_face_encodings) == 0:
        return metadata

    # Calculate the face distance between the unknown face and every face on in our known face list
    # This will return a floating point number between 0.0 and 1.0 for each known face. The smaller the number,
    # the more similar that face was to the unknown face.
    face_distances = face_recognition.face_distance(known_face_encodings, face_encoding)

    # Get the known face that had the lowest distance (i.e. most similar) from the unknown face.
    best_match_index = np.argmin(face_distances)

    # If the face with the lowest distance had a distance under 0.6, we consider it a face match.
    # 0.6 comes from how the face recognition model was trained. It was trained to make sure pictures
    # of the same person always were less than 0.6 away from each other.
    # Here, we are loosening the threshold a little bit to 0.65 because it is unlikely that two very similar
    # people will come up to the door at the same time.
    if face_distances  timedelta(minutes=5):
            metadata["first_seen_this_interaction"] = datetime.now()
            metadata["seen_count"] += 1

    return metadata

def main_loop():
    # Get access to the webcam. The method is different depending on if this is running on a laptop or a Jetson Nano.
    if running_on_jetson_nano():
        # Accessing the camera with OpenCV on a Jetson Nano requires gstreamer with a custom gstreamer source string
        video_capture = cv2.VideoCapture(get_jetson_gstreamer_source(), cv2.CAP_GSTREAMER)
    else:
        # Accessing the camera with OpenCV on a laptop just requires passing in the number of the webcam (usually 0)
        # Note: You can pass in a filename instead if you want to process a video file instead of a live camera stream
        video_capture = cv2.VideoCapture(0)

    # Track how long since we last saved a copy of our known faces to disk as a backup.
    number_of_faces_since_save = 0

    while True:
        # Grab a single frame of video
        ret, frame = video_capture.read()

        # Resize frame of video to 1/4 size for faster face recognition processing
        small_frame = cv2.resize(frame, (0, 0), fx=0.25, fy=0.25)

        # Convert the image from BGR color (which OpenCV uses) to RGB color (which face_recognition uses)
        rgb_small_frame = small_frame[:, :, ::-1]

        # Find all the face locations and face encodings in the current frame of video
        face_locations = face_recognition.face_locations(rgb_small_frame)
        face_encodings = face_recognition.face_encodings(rgb_small_frame, face_locations)

        # Loop through each detected face and see if it is one we have seen before
        # If so, we'll give it a label that we'll draw on top of the video.
        face_labels = []
        for face_location, face_encoding in zip(face_locations, face_encodings):
            # See if this face is in our list of known faces.
            metadata = lookup_known_face(face_encoding)

            # If we found the face, label the face with some useful information.
            if metadata is not None:
                time_at_door = datetime.now() - metadata['first_seen_this_interaction']
                face_label = f"At door {int(time_at_door.total_seconds())}s"

            # If this is a brand new face, add it to our list of known faces
            else:
                face_label = "New visitor!"

                # Grab the image of the the face from the current frame of video
                top, right, bottom, left = face_location
                face_image = small_frame
                face_image = cv2.resize(face_image, (150, 150))

                # Add the new face to our known face data
                register_new_face(face_encoding, face_image)

            face_labels.append(face_label)

        # Draw a box around each face and label each face
        for (top, right, bottom, left), face_label in zip(face_locations, face_labels):
            # Scale back up face locations since the frame we detected in was scaled to 1/4 size
            top *= 4
            right *= 4
            bottom *= 4
            left *= 4

            # Draw a box around the face
            cv2.rectangle(frame, (left, top), (right, bottom), (0, 0, 255), 2)

            # Draw a label with a name below the face
            cv2.rectangle(frame, (left, bottom - 35), (right, bottom), (0, 0, 255), cv2.FILLED)
            cv2.putText(frame, face_label, (left + 6, bottom - 6), cv2.FONT_HERSHEY_DUPLEX, 0.8, (255, 255, 255), 1)

        # Display recent visitor images
        number_of_recent_visitors = 0
        for metadata in known_face_metadata:
            # If we have seen this person in the last minute, draw their image
            if datetime.now() - metadata["last_seen"]  5:
                # Draw the known face image
                x_position = number_of_recent_visitors * 150
                frame[30:180, x_position:x_position + 150] = metadata["face_image"]
                number_of_recent_visitors += 1

                # Label the image with how many times they have visited
                visits = metadata['seen_count']
                visit_label = f"{visits} visits"
                if visits == 1:
                    visit_label = "First visit"
                cv2.putText(frame, visit_label, (x_position + 10, 170), cv2.FONT_HERSHEY_DUPLEX, 0.6, (255, 255, 255), 1)

        if number_of_recent_visitors > 0:
            cv2.putText(frame, "Visitors at Door", (5, 18), cv2.FONT_HERSHEY_DUPLEX, 0.8, (255, 255, 255), 1)

        # Display the final frame of video with boxes drawn around each detected fames
        cv2.imshow('Video', frame)

        # Hit 'q' on the keyboard to quit!
        if cv2.waitKey(1) & 0xFF == ord('q'):
            save_known_faces()
            break

        # We need to save our known faces back to disk every so often in case something crashes.
        if len(face_locations) > 0 and number_of_faces_since_save > 100:
            save_known_faces()
            number_of_faces_since_save = 0
        else:
            number_of_faces_since_save += 1

    # Release handle to the webcam
    video_capture.release()
    cv2.destroyAllWindows()

if __name__ == "__main__":
    load_known_faces()
    main_loop()