 IoT
IoT 2026 MQTT IoT Practice: ESP32 Data Collection + Node-RED Visualization
Why is MQTT the Standard for IoT?
Friends working on IoT projects have probably heard of MQTT. But you might have also wondered: Can’t HTTP transmit data too? WebSocket works too, so why learn a less familiar protocol specifically?
One sentence answer: MQTT is specifically designed for resource-constrained devices and unreliable networks.
HTTP needs to carry a complete Header with each request, a single GET request could be hundreds of bytes. But MQTT’s minimum packet is only 2 bytes. Under NB-IoT or 2G networks, traffic is money, MQTT can help you save a lot.
More importantly, MQTT’s publish/subscribe (Pub/Sub) model. One sensor publishes data, multiple clients can receive it simultaneously, no polling needed, no long connections required. This decoupled design makes system expansion very easy.
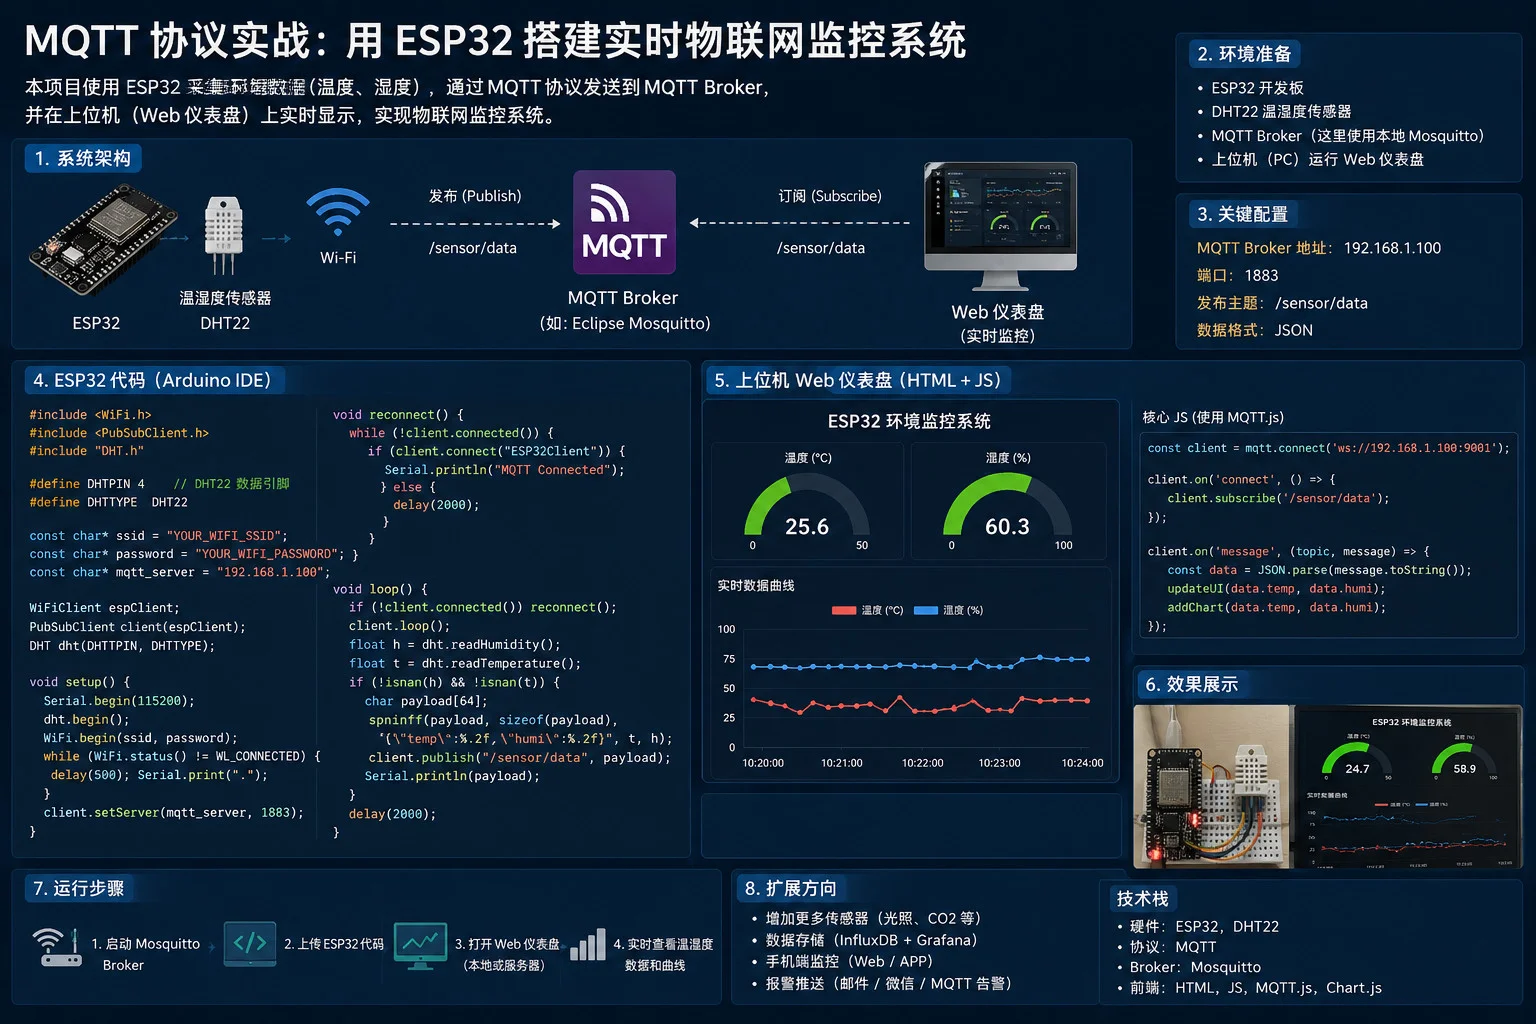
In this article, I’ll take you through building a complete MQTT IoT monitoring system from scratch: using ESP32 to collect temperature and humidity data, sending it to Mosquitto server via MQTT protocol, and finally using Node-RED for visualization dashboard. All hands-on, code you can run directly.
Hardware List
| Hardware | Model | Unit Price | Quantity | Notes |
|---|---|---|---|---|
| Main board | ESP32 DevKit V1 | ¥22 | 1 | With WiFi/BLE |
| Temperature/humidity sensor | DHT22 (AM2302) | ¥12 | 1 | Better accuracy than DHT11 |
| Breadboard | 830 holes | ¥8 | 1 | Prototype building |
| Jumper wires | Male-to-male | ¥5 | 1 pack | For wiring |
| USB data cable | Micro USB | ¥5 | 1 | Power and flashing |
| Total | ¥52 |
Purchase suggestions:
-
Buy DHT22 with PCB board type, three pins can plug directly into breadboard, better than bare modules
-
Choose ESP32 with ESP32-WROOM-32D chip, best compatibility
-
If budget is tight, DHT11 also works (¥4), but accuracy is worse (±2°C vs ±0.5°C)
Hardware Wiring
Wiring DHT22 and ESP32 is very simple, only needs three wires:
| DHT22 Pin | ESP32 Pin | Description |
|---|---|---|
| VCC | 3V3 | Power 3.3V |
| GND | GND | Ground |
| DATA | GPIO4 | Data pin |
ESP32 Dev Board        DHT22 Sensor
┌─────────────┐    ┌──────────┐
│   3V3  ○────┼────┤ VCC      │
│   GND ○────┼────┤ GND      │
│  GPIO4 ○───┼────┤ DATA     │
└─────────────┘    └──────────┘
Notes:
-
If your DHT22 is a bare module (no PCB board), need to connect a 4.7kΩ-10kΩ pull-up resistor between DATA and VCC
-
DHT22 modules with PCB board usually already have integrated pull-up resistor, can plug directly
-
Must use 3.3V power, connecting 5V will damage the sensor
Server Side Deployment: Mosquitto
First deploy MQTT Broker. We use Eclipse Mosquitto, lightweight, stable, open source.
Install Mosquitto
# Ubuntu/Debian
sudo apt update
sudo apt install -y mosquitto mosquitto-clients

# CentOS/RHEL
sudo dnf install -y mosquitto mosquitto-clients

# macOS
brew install mosquitto
Configure Mosquitto
Under default configuration, Mosquitto only allows local access. If you want ESP32 to connect from LAN, need to modify configuration:
sudo nano /etc/mosquitto/mosquitto.confAdd the following content:
# Listen on default port 1883
listener 1883
# Allow anonymous connections (test environment, recommend setting username/password for production)
allow_anonymous true
# Log level
log_type all
Restart service:
sudo systemctl restart mosquitto
sudo systemctl enable mosquitto
Verify Server
Test with command line tools:
# Terminal 1: Subscribe to topic
mosquitto_sub -h localhost -t "sensor/temperature" -v

# Terminal 2: Publish message
mosquitto_pub -h localhost -t "sensor/temperature" -m "25.6"

# Terminal 1 should receive: sensor/temperature 25.6
If you can see the message, server deployment is successful.
Production Environment Security Configuration (Optional)
If server is exposed to public network, must set up authentication:
# Set password file
sudo mosquitto_passwd -c /etc/mosquitto/passwd iot_user

# Modify mosquitto.conf
sudo nano /etc/mosquitto/mosquitto.conf
listener 1883
allow_anonymous false
password_file /etc/mosquitto/passwdESP32 Side Code
Use Arduino IDE to write ESP32 firmware. First install required libraries:
-
DHT Library: Search “DHT sensor library” in Arduino IDE library manager and install (by Adafruit)
-
Adafruit Unified Sensor: Dependency library for DHT library, usually prompts to install together when installing DHT library
-
PubSubClient: Search “PubSubClient” in library manager and install (by Nick O’Leary), for MQTT communication
-
WiFi Library: ESP32 development board comes with WiFi library built-in, no separate installation needed
Complete Code
#include <WiFi.h>
#include <PubSubClient.h>

#include <DHT.h>

// WiFi configuration
const char* ssid = "YOUR_WIFI_SSID";
const char* password = "YOUR_WIFI_PASSWORD";

// MQTT configuration
const char* mqtt_server = "192.168.1.100";  // Change to your Mosquitto server IP
const int mqtt_port = 1883;
const char* mqtt_user = "iot_user";         // Can leave empty for anonymous mode
const char* mqtt_password = "your_password"; // Can leave empty for anonymous mode

// DHT22 configuration
#define DHTPIN 4
#define DHTTYPE DHT22
DHT dht(DHTPIN, DHTTYPE);

// MQTT client
WiFiClient espClient;
PubSubClient client(espClient);

// Publish interval (milliseconds)
const unsigned long PUBLISH_INTERVAL = 5000;
unsigned long lastPublish = 0;

void setup() {
  Serial.begin(115200);
  dht.begin();

  // Connect to WiFi
  Serial.print("Connecting to WiFi");
  WiFi.begin(ssid, password);
  while (WiFi.status() != WL_CONNECTED) {
    delay(500);
    Serial.print(".");
  }
  Serial.println("");
  Serial.print("IP address: ");
  Serial.println(WiFi.localIP());

  // Connect to MQTT
  client.setServer(mqtt_server, mqtt_port);
  connectMQTT();
}

void connectMQTT() {
  while (!client.connected()) {
    Serial.print("Connecting to MQTT...");
    String clientId = "ESP32-Sensor-" + String(random(0xffff), HEX);
    if (client.connect(clientId.c_str(), mqtt_user, mqtt_password)) {
      Serial.println("connected");
      // Subscribe to control topic (optional, for remote commands)
      client.subscribe("device/esp32/cmd");
    } else {
      Serial.print("failed, rc=");
      Serial.print(client.state());
      Serial.println(" retrying in 5s");
      delay(5000);
    }
  }
}

void callback(char* topic, byte* payload, unsigned int length) {
  Serial.print("Received [");
  Serial.print(topic);
  Serial.print("]: ");
  for (int i = 0; i < length; i++) {
    Serial.print((char)payload[i]);
  }
  Serial.println();
}

void loop() {
  if (!client.connected()) {
    connectMQTT();
  }
  client.loop();

  unsigned long now = millis();
  if (now - lastPublish >= PUBLISH_INTERVAL) {
    lastPublish = now;

    float temperature = dht.readTemperature();
    float humidity = dht.readHumidity();

    if (isnan(temperature) || isnan(humidity)) {
      Serial.println("Failed to read sensor!");
      return;
    }

    // Publish to MQTT topics
    char tempStr[8];
    char humStr[8];
    dtostrf(temperature, 4, 1, tempStr);
    dtostrf(humidity, 4, 1, humStr);

    client.publish("sensor/temperature", tempStr);
    client.publish("sensor/humidity", humStr);

    Serial.printf("Temperature: %.1f°C, Humidity: %.1f%%\n", temperature, humidity);
  }
}
Code Key Points Explanation
Topic Design:
-
sensor/temperature— Temperature data -
sensor/humidity— Humidity data -
device/esp32/cmd— Device control commands (subscription)
This hierarchical naming is very common, using / to separate topic levels. You can also use device ID as prefix, like home/livingroom/temp, convenient for expanding multiple devices.
Connection Maintenance:
client.loop() must be called frequently in loop, it handles MQTT keep-alive heartbeat and receiving messages. If not called, server will think client is offline.
QoS Level: Default is QoS 0 (fire and forget). If data is important, can change to QoS 1:
client.publish("sensor/temperature", tempStr, true); // QoS 1Visualization: Node-RED Dashboard
Data is sent to MQTT, next use Node-RED to make a real-time monitoring dashboard.
Install Node-RED
# Install Node.js (if not installed)
curl -fsSL https://deb.nodesource.com/setup_20.x | sudo -E bash -
sudo apt install -y nodejs

# Install Node-RED
sudo npm install -g --unsafe-perm node-red

# Start
node-red &
Configure Flow
Open http://serverIP:1880 in browser, drag and drop the following nodes to connect:
mqtt in → function → debug
                ↓
ui gauge-
mqtt in node: Configure Broker IP and port 1883, subscribe to
sensor/#to receive all sensor data -
function node: Parse JSON messages, extract temperature and humidity values, route to different display components respectively
if (msg.topic === "sensor/temperature") {
  msg.title = "Temperature";
  msg.value = msg.payload;
  msg.unit = "°C";
} else if (msg.topic === "sensor/humidity") {
  msg.title = "Humidity";
  msg.value = msg.payload;
  msg.unit = "%";
}

return msg;-
ui gauge node:
- Temperature: Range -10 to 50, color green→yellow→red
- Humidity: Range 0 to 100, color blue→green→yellow
-
ui chart node (optional):
- Add line chart to record historical data trends
After clicking Deploy, open http://serverIP:1880/ui to see real-time data.
Advanced: Multi-Device Networking
One ESP32 collecting data is just the beginning. In actual projects you might have multiple sensor nodes, MQTT’s advantages show here.
Device Naming Convention
Recommend using location/deviceType/dataType format:
home/livingroom/temp     → Living room temperature
home/livingroom/humidity → Living room humidity
home/bedroom/temp        → Bedroom temperature
office/workshop/co2      → Workshop CO2 concentration
Use LWT to Detect Device Offline
Last Will and Testament is a practical MQTT feature. When device disconnects unexpectedly, Broker automatically publishes a will message:
// Set will before connect
client.setWill("device/esp32/status", "offline");
client.connect(clientId.c_str(), mqtt_user, mqtt_password);
// After successful connection, publish online message
client.publish("device/esp32/status", "online", true);  // retained = true
This way you can subscribe to device/+/status in Node-RED to know in real-time which devices are online.
Common Problem Troubleshooting
1. ESP32 Can’t Connect to WiFi
Symptom: Serial port keeps printing Connecting to WiFi...
Troubleshooting:
-
Check if SSID and password are correct (note case sensitivity)
-
Confirm ESP32 and router distance isn’t too far (recommend within 1 meter for initial debugging)
-
Some routers have 5GHz only enabled, ESP32 only supports 2.4GHz
2. MQTT Connection Failed, Returns rc=-2
Symptom: failed, rc=-2
Cause: Cannot connect to Broker server
Troubleshooting:
-
Confirm Mosquitto server IP address is correct
-
Check if firewall allows port 1883:
sudo ufw allow 1883 -
Use
mosquitto_subto test if server is working on same network -
If server is on cloud server, check security group rules
3. Sensor Readings Are NaN
Symptom: Serial port prints Failed to read sensor!
Troubleshooting:
-
Check if wiring is loose
-
Is DATA pin connected correctly (default GPIO4)
-
Bare module DHT22 needs pull-up resistor, PCB board version doesn’t
-
DHT22 read interval cannot be less than 2 seconds, too frequent will fail
4. Data Published Successfully but Node-RED Doesn’t Receive
Troubleshooting:
-
Confirm Node-RED’s mqtt in node topic configuration is correct
-
Use
mosquitto_sub -h serverIP -t "sensor/#" -vto confirm data is actually being sent -
Check if Node-RED and Mosquitto are on same network
5. ESP32 Disconnects After Running for a While
Cause: WiFi or MQTT connection disconnected without auto-reconnection
Solution: Code already has reconnection logic, but if problem persists, can:
-
Add watchdog timer
-
Check if power supply is stable (insufficient USB power can cause WiFi module restart)
-
Use external 5V/1A power supply instead of USB power
Summary
MQTT protocol’s core is just three things: connect, publish, subscribe. But it’s precisely this simple design that makes it the most mainstream communication protocol in the IoT field.
The system we built today only has temperature and humidity sensors, but the architecture can already expand to dozens or hundreds of devices. Just need to assign each device a unique Client ID and topic prefix, data can flow to the server in an orderly manner.
Next steps you can try:
-
Add more sensor types (CO2, PM2.5, light)
-
Use ESP32’s Deep Sleep mode for battery power (months of battery life)
-
Integrate with Home Assistant for smart home linkage
-
Use InfluxDB + Grafana instead of Node-RED for more professional data visualization
Hope this blog post is helpful to you!